|
September 24, 2016
Building an Orchid Tree
Do you like working on 3-D jigsaw puzzles?
By: Peter J Ziek

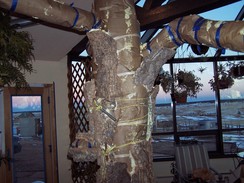
Paper wrapped foam blocks and initial cork pieces

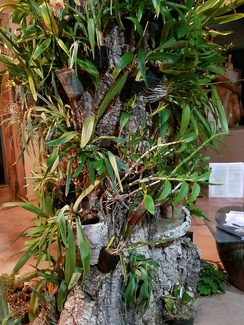
Finished tree with orchids attached

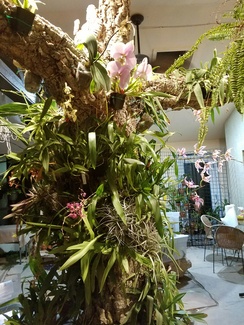
Finished tree with Orchids in bloom
For many years now people have come to our house/farm and been surprised by the “Orchid Tree” in our greenhouse entry way. This document will describe how we built a tree. It assumes you have a space where you can erect a tree without damaging your existing home or greenhouse.
Step 1. The basic underlying support for the tree is a 4-5” round post that is 8’ long. Bury the post at least 18-24” into the ground. For the most stable post fill the hole around the post with about a half bag (30 lbs.) of dry concrete mix and add some water to set the mix. Allow it to sit for a day, then fill in the remaining part of the hole with dirt and tamp down.
Step 2. To add branches uses 1/2” or 5/8” re-bar bent to the shape of the branch and cut to the length you need each branch to be. Each branch is attached to the post with a couple 1/2” or 5/8” half round pipe clips. The outer end of each branch should also be clamped to something stable like a wall, beam, etc.
Step 3. I used scrap pieces of foam found in packages of electronics or anything fragile. I found most of it at shippers and electronic stores that they were going to throw out. Depending on how thick you want your tree trunk and/or tree limbs tie pieces of foam around the core (post or rebar) to the thickness you want minus about 6”. Now wrap with heavy paper (I use a roll of craft paper) and seal with tape. See picture of tree showing underlying paper covered frame.
Step 4. Fill spaces between core and paper with insulating foam spray. I used the foam that minimally expands and did this in small increments to ensure I maintained the shape and size I wanted. For our tree that is 8’ tall and about 2’ in diameter I probably used close to a dozen cans of foam.
Step 5. Once the basic frame is complete you now have the task of adding the cork bark. We purchased our cork bark from an online seller in Florida, but there are several online stores selling cork bark pieces. I have added some of them to the end of this article. Cork bark pieces come in a wide variety of sizes and we used several boxes of cork. You have to treat this phase as a really big 3-D jigsaw puzzle. You start by selecting several large pieces and tying them tightly to the foamed frame. You can either use a sharp knife to fit them together or tie them with some space between each piece. You then use more of the insulating foam behind each piece to glue it in place while still tied.
Step 6. After a day you untie the pieces and they should stay where you foamed them. With a sharp knife remove any excess foam around these pieces. Now you start fitting a few of the remaining pieces (trim them so they butt closely to the pieces in place ) and tie these. Foam behind each piece as before and wait for the foam to set up and dry. Repeat this step adding new pieces until the frame is entirely covered with cork.
Step 7. If you are careful to trim the final pieces of cork so they closely fit the spaces between prior pieces of cork, you will find the foam blends with the cork and most seams tend to visually disappear. People will think you brought a tree into your space. Now use screws and wire to attach the orchids to your tree and you are done. You can water the orchids on the tree and not worry about dampness causing rot. Cork bark is very resistant to moisture, so your tree should last a lifetime. The bottom two pictures are tree today, more than 10 years after we built it.
References
|